
Accept crypto with CoinGate
Accept crypto with confidence using everything you need in one platform.
How to Buy VPN with Bitcoin, PayPal, or Card
Sourcing the right VPN and setting it up on your device should be a simple process.
Thankfully, all of the leading VPN providers make it easy to install their tools on whatever device you choose.
How to get a VPN and Install it on Any Device
In this article we’re going to outline what a VPN connection is, why you might need one, and how to install them on different devices, from smartphones and laptops to smart TVs and game consoles regardless of their operating system (OS).
We’ll also explore the following topics:
- How to get a VPN on a Windows PC
- How to get a VPN on Macbook
- How to get a VPN on Android
- How to get a VPN on iPhone
- How to get a VPN on a Smart TV
- How to get a VPN on a Games Console
- How to get a VPN on a router
Plus, you’ll learn how easy it is to install and secure your online activities using NordVPN, Surfshark, CactusVPN, or HideMy.name.
What is a VPN Connection?
A Virtual Private Network (VPN) connection is a technology that allows secure and private data transmission over the internet by creating an encrypted connection over a less secure network – typically via public internet.
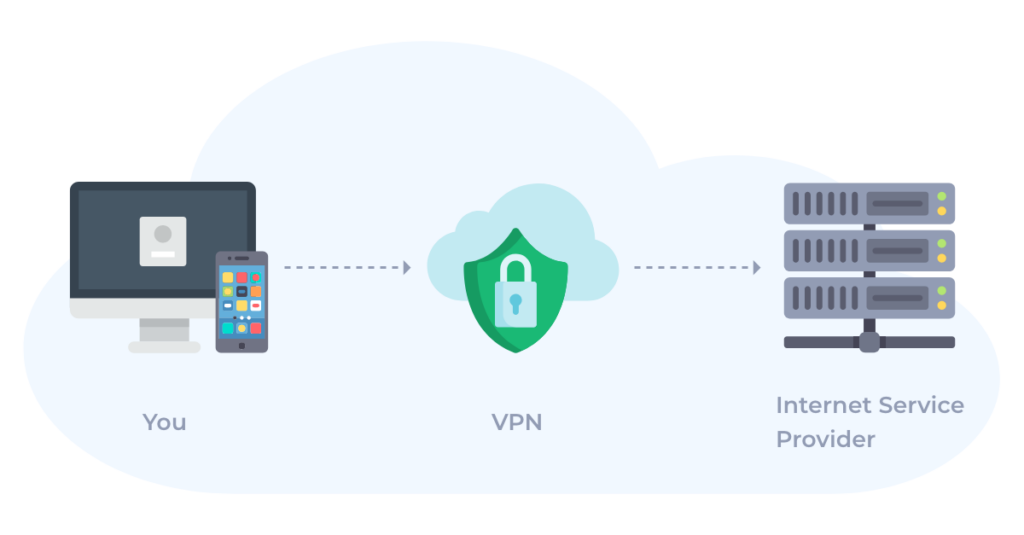
In essence, a VPN extends a private network across a public network, enabling users to send and receive data as if their computing devices were directly connected to the private network.
Key Business Benefits of VPN:
- Enhanced Security – By encrypting data transmitted over the network, a VPN ensures that sensitive company information remains confidential and protected from unauthorized access.
- Remote Access – VPNs allow employees to securely access their company’s internal network from remote locations, facilitating flexible work arrangements and maintaining productivity.
- Network Scalability – As businesses grow, the cost of building a dedicated private network can be prohibitive. VPNs allow organizations to tap into network lines and capacity already available, significantly reducing the costs of network expansion.
- Reduced Operational Costs – Once a VPN network is established, the maintenance costs are relatively low compared to traditional leased lines or long-distance calls for remote access.
- Secure Data Sharing – For businesses that need to share sensitive data regularly with partners or customers, a VPN offers a secure way to share that data without the risk associated with traditional methods.
A VPN connection is an essential tool for modern businesses, enhancing security, supporting global operations, and facilitating safe, cost-effective communication and data sharing across geographically dispersed teams.
What Devices Can Use a VPN Server
A VPN server can be employed across multiple devices and operating systems, making them versatile tools for enhancing security and privacy for your computer’s internet connection and across various other digital platforms.
VPNs for Personal Computers
VPNs are commonly used on personal computers, including those running Windows, macOS, and Linux operating systems. They are suitable for both desktops and laptops, providing secure internet access for browsing, communication, and file sharing.
VPNs for Mobile Devices
Mobile phones and tablets running iOS (iPhones and iPads) and Android operating systems can support VPNs. This is particularly useful for securing data when using public Wi-Fi networks.
VPNs for Routers
Installing a VPN directly on a router secures the internet connection for all devices connected to that router. This is an efficient way to ensure that all network traffic is encrypted, including devices and network users that may not support native VPN applications such as smart home devices.
VPNs for Smart TVs and Streaming Devices
Some smart TVs and streaming devices (like Apple TV, Amazon Fire Stick, and others) can be configured to use VPNs, either directly or through a router, enhancing privacy and potentially bypassing geographical content restrictions.
VPNs for Other Devices
Devices such as gaming consoles and some types of IoT (Internet of Things) devices can often use a VPN service through router configurations, as many of these devices do not support native VPN applications.
How to Set Up your VPN Connection
Setting up a VPN has been simplified by most premium providers to ensure a quick and straightforward process. This simplified focus allows VPN owners to quickly install and use their service on dedicated apps on any device.
For those who prefer a hands-on approach, manual setup options are also available, which, while more time-consuming, are accessible with the right guidance.
Each VPN provider will have their own installation and set up configurations for different devices and different OS options.
How to Download and Install NordVPN on Your Device
NordVPN offers a wide array of payment options to suit every user’s convenience. Customers can make payments using cryptocurrency, credit card, PayPal, AmazonPay, Sofort, and prepaid (debit) cards, among other methods.

Additionally, payments can also be made through iTunes or Google Pay, ensuring flexibility and ease of transaction for all users.
Cryptocurrency and Bitcoin payments can be made quickly and with total security using the CoinGate crypto payment processor.
Setting Up and Using NordVPN
Step 1: Download the NordVPN App
Start by downloading the NordVPN app from the official website or your device’s app store.
Step 2: Install the App
- Go to your ‘downloads’ folder and locate the ‘NordVPNInstall’ file. Double-click to initiate the installation.
- When prompted by a pop-up asking to allow the app to make changes to your device, click ‘Yes’.
- Follow the installer prompts by clicking ‘Next’ to proceed. You can choose to create shortcuts on your Desktop or Start Menu during this process.
- Complete the installation by clicking ‘Install’, and then “Finish” to launch the NordVPN.
Step 3: Log In and Connection
- Open the NordVPN app by clicking its logo on your desktop.
- Click ‘Log In’ and your browser will open to the NordVPN account login page. Enter your username or email and password, or follow the instructions to create a new account.
- Once logged in, you can connect to a VPN server by clicking ‘Quick Connect’. This will automatically select the best server for you. Once connected, the status will change from ‘Not connected’ to ‘Connected’.
This short and simple guide provides a detailed but straightforward path to setting and using NordVPN on any compatible device. If you want to learn more about NordVPN services, we suggest reading an in-depth review.
How to Download and Install Surfshark VPN on a Windows Device
Surfshark VPN provides flexible payment options, including the ability to pay with cryptocurrencies.
Customers can make bitcoin payments using CoinGate, offering a secure and convenient method for those preferring to use cryptocurrencies.
Setting Up and Using Surfshark VPN
Step 1: Download the Surfshark VPN
- Start the process by downloading the Surfshark VPN for Windows. You can find the download link under the ‘Download the Windows App’ button. The site also includes download options for other Operating Systems and devices.
Step 2: Install the Surfshark VPN App
- Once the download is complete, go to your Downloads folder and locate the ‘Surfshark.Setup’ file.
- Double-click the file to begin installation. If prompted by a security message asking if you want to allow the app to make changes to your device, click ‘Yes.’
- Follow the on-screen instructions and wait for the installation process to complete automatically. The app will self-launch once the installation process is complete.
Step 3: Log Into the Surfshark App
- When the Surfshark app opens, you will be prompted to log in. If you are an existing user, enter your registered email address and password. If you don’t have a subscription, click the ‘Create account’ button to sign up.
- After entering your login credentials, click the ‘Log in’ button to access your account.
- If you have enabled two-factor authentication (2FA) – for added security – you will need to enter the 2FA code sent to your device. Enter the code and press ‘Verify’ to complete the login process.
By following these steps, both new and existing VPN service users can easily install and set up a Surfshark VPN on any Windows device.
How to Download and Set Up CactusVPN on a Windows Device

Because a customer’s privacy is always of paramount importance, CactusVPN can be purchased instantly using cryptocurrencies via the CoinGate payment processor.
Setting Up and Using CactusVPN
Step 1: Meet the Requirements
- Before you begin, make sure that you have a CactusVPN account. If you don’t already have an account there yet, you can sign up for the first time and try CactusVPN services for free.
- If you already have an account and have forgotten your password, you can reset it through the link provided.
- Confirm that your Windows version is Vista or higher.
Step 2: Download and Install the CactusVPN
- Download the CactusVPN from the official website.
- Open the downloaded file and click ‘Next’ to start the installation.
- Read and agree to the License Agreement.
- Follow the prompts by clicking ‘Next,’ then ‘Install’ when the installation window appears.
- Once the installation is complete, click ‘Next’ and then ‘Finish’ to launch the app.
Step 3: Sign In to the CactusVPN
- Enter your CactusVPN account email and password.
- If this is your first login, select the default subscription you wish to use and click ‘Continue.’
Step 4: Connect to the VPN
- In the CactusVPN app, navigate to the VPN Service tab.
- Choose a VPN server location you wish to connect to and click the ‘Connect’ button.
- For a personalized experience, add servers to your favorites by clicking the star icon next to the server name. You may also use the filter options to find servers that meet specific criteria, like allowing P2P activity.
- Optimize your connection by sorting servers by speed.
How to Download and Install HideMy.name VPN on Any Device
HideMy.name VPN offers a wide variety of payment options to accommodate all users. Accepted methods include credit cards, electronic money, cryptocurrencies, cash in terminals, and SMS payments.
For those preferring to use digital wallets, Skrill is available upon request. They also, accept cryptocurrency transactions through CoinGate.
Setting Up and Using HideMy.name
Step 1: Download and Install the HideMy.name VPN App
Begin by downloading the HideMy.name VPN application suitable for your device. HideMy.name VPN supports macOS, Windows, iOS, Android, Linux, and routers.
Step 2: Enter the Activation Code
After purchasing the VPN or opting for a trial period, you will receive a code in your email. Enter this code into the VPN to activate your account.
Step 3: Select Server Locations
To set up a VPN connection, choose a VPN server to connect to. You can allow the app to select a server automatically or manually pick one that specifically suits the needs of the site you wish to access.
Step 4: Connect to the VPN
Click the ‘Connect’ button in the app. Once connected, your IP address will become anonymous to other network users, and your internet connection will be encrypted, ensuring privacy and security.
By following these straightforward instructions, you can easily install and set up HideMy.name VPN on your computer, smartphone, or router.
Generic Instructions – How to Set Up any VPN on Any Device
Step 1: Choose a VPN
Selecting the right VPN is crucial. For a balance of ease of use and broad device compatibility, consider a top-tier VPN like NordVPN. However, the choice of VPN largely depends on your specific needs and preferences.
Step 2: Sign Up for the VPN
Visit the VPN’s official website to sign up. Choose from various subscription plans, with longer commitments generally offering better value. Ensure you sign up via the VPN’s website to take advantage of any money-back guarantees.
Step 3: Download and Install the VPN
After signing up, log in to your VPN account on the website and navigate to the app download section. Select your operating system and click ‘Download.’ For Windows, macOS, Android, and iOS, install the app directly by running the downloaded installer. Linux users will likely need to follow specific command-line installation instructions provided by the VPN service.
Step 4: Log In and Configure the App
Open the installed VPN app and log in using your account details. If required, enter an activation code that you’ve been sent. Opt-out of any non-essential data-sharing preferences, such as crash report data, and decide if you want the VPN to launch at startup.
Step 5: Connect to a Server
Within the app, search for or select a server location that meets your needs. Once you’ve chosen a server, either click on it or hit a ‘Connect’ button to initiate the VPN connection.
Step 6: Adjust Settings for Specific Needs
After connecting, consider adjusting the VPN’s settings to optimize for specific activities like streaming or increased security. Most VPNs offer customizable settings to enhance your experience.
By following these steps, you can set up and start using a VPN on virtually any device, ensuring your online interactions are secure and private.
Whether you’re a beginner or a tech-savvy user, these guidelines will help you navigate the VPN installation and set up the process with ease.
How to Use a VPN on PlayStation, Xbox, and Smart TVs
Using a VPN on gaming consoles like PlayStation and Xbox, or on smart TVs, can be easily achieved through Smart DNS.
This method reroutes your device’s internet traffic through a DNS server of the VPN you use. This masks your geographical location to bypass geo-restrictions and access content from different regions.
Keep in mind, however, that Smart DNS does not encrypt your data or hide your IP address like a traditional VPN, making it less secure but sufficient for streaming geo-blocked content.
Step 1: Activate Smart DNS
Access the Smart DNS feature from your VPN provider’s account page. You may need to register your IP address and then obtain the DNS server address from the VPN service.
Step 2: Configure DNS on Your Device
On your PlayStation, Xbox, or smart TV, navigate to the network settings and locate the DNS settings. Enter the DNS address provided by your VPN and confirm by selecting ‘OK.’
Step 3: Choose Your Preferred Location
If available in the VPN control panel, select a geographic location that aligns with the streaming services you want to access. Some Smart DNS services may limit you to a single location, often based on where the DNS server is situated.
Step 4: Start Streaming
With the DNS configured, you can now enjoy streaming movies and shows from your chosen location.
For users whose VPN does not support Smart DNS, there is an alternative method that involves a Windows PC or laptop.
You can create a hotspot on this device when you set up a VPN and connect your console or smart TV to mobile hotspot on the network to share the VPN’s benefits.
These methods provide a straightforward way to extend the advantages of a VPN to devices that do not natively support VPN apps, allowing for an expanded streaming experience.
Frequently Asked Questions About VPNs
What is a Virtual Private Network (VPN)?
Virtual Private Networks are powerful tools that encrypt your internet connection and disguise your online identity and/or location.
When you set up a VPN it makes it harder for third parties to track your internet or online activities or steal your data. This enhanced privacy and security is essential where cyber threats are increasingly sophisticated across multiple online activities and helps you to stay safe online.
What does a VPN do?
A VPN works by routing your device’s internet connection through the VPN provider’s server instead of the local network of your internet service provider (ISP). This ensures that all data transmitted and received is encrypted and secure.
What is a VPN Provider?
A VPN provider is a company that offers Virtual Private Network (VPN) services to users. VPNs are tools that help secure and privatize internet connections by encrypting the data sent and received over the network and routing it through servers managed by the provider.
Can I get a free VPN?
Yes, you can get a free VPN service. However, it’s vitally important to remember that many free VPNs utilize weak or outdated encryption protocols, such as PPTP. A free VPN connection service can expose you to a whole range of cyber threats and data theft.
Accept crypto with CoinGate
Accept crypto with confidence using everything you need in one platform.

