Company Updates, Crypto Payments
CoinGate H1 2025 Crypto Payments Report: MiCA’s Shakeup and the Rise of USDC
Last updated: July 8, 2025 8 min read

Vilius Barbaravičius
The first half of 2025 is in the books, and crypto payments at CoinGate continue to evolve in exciting ways.
We’re back with our latest data report to unpack the key trends shaping crypto payments – just as we did in our previous 2024 report.
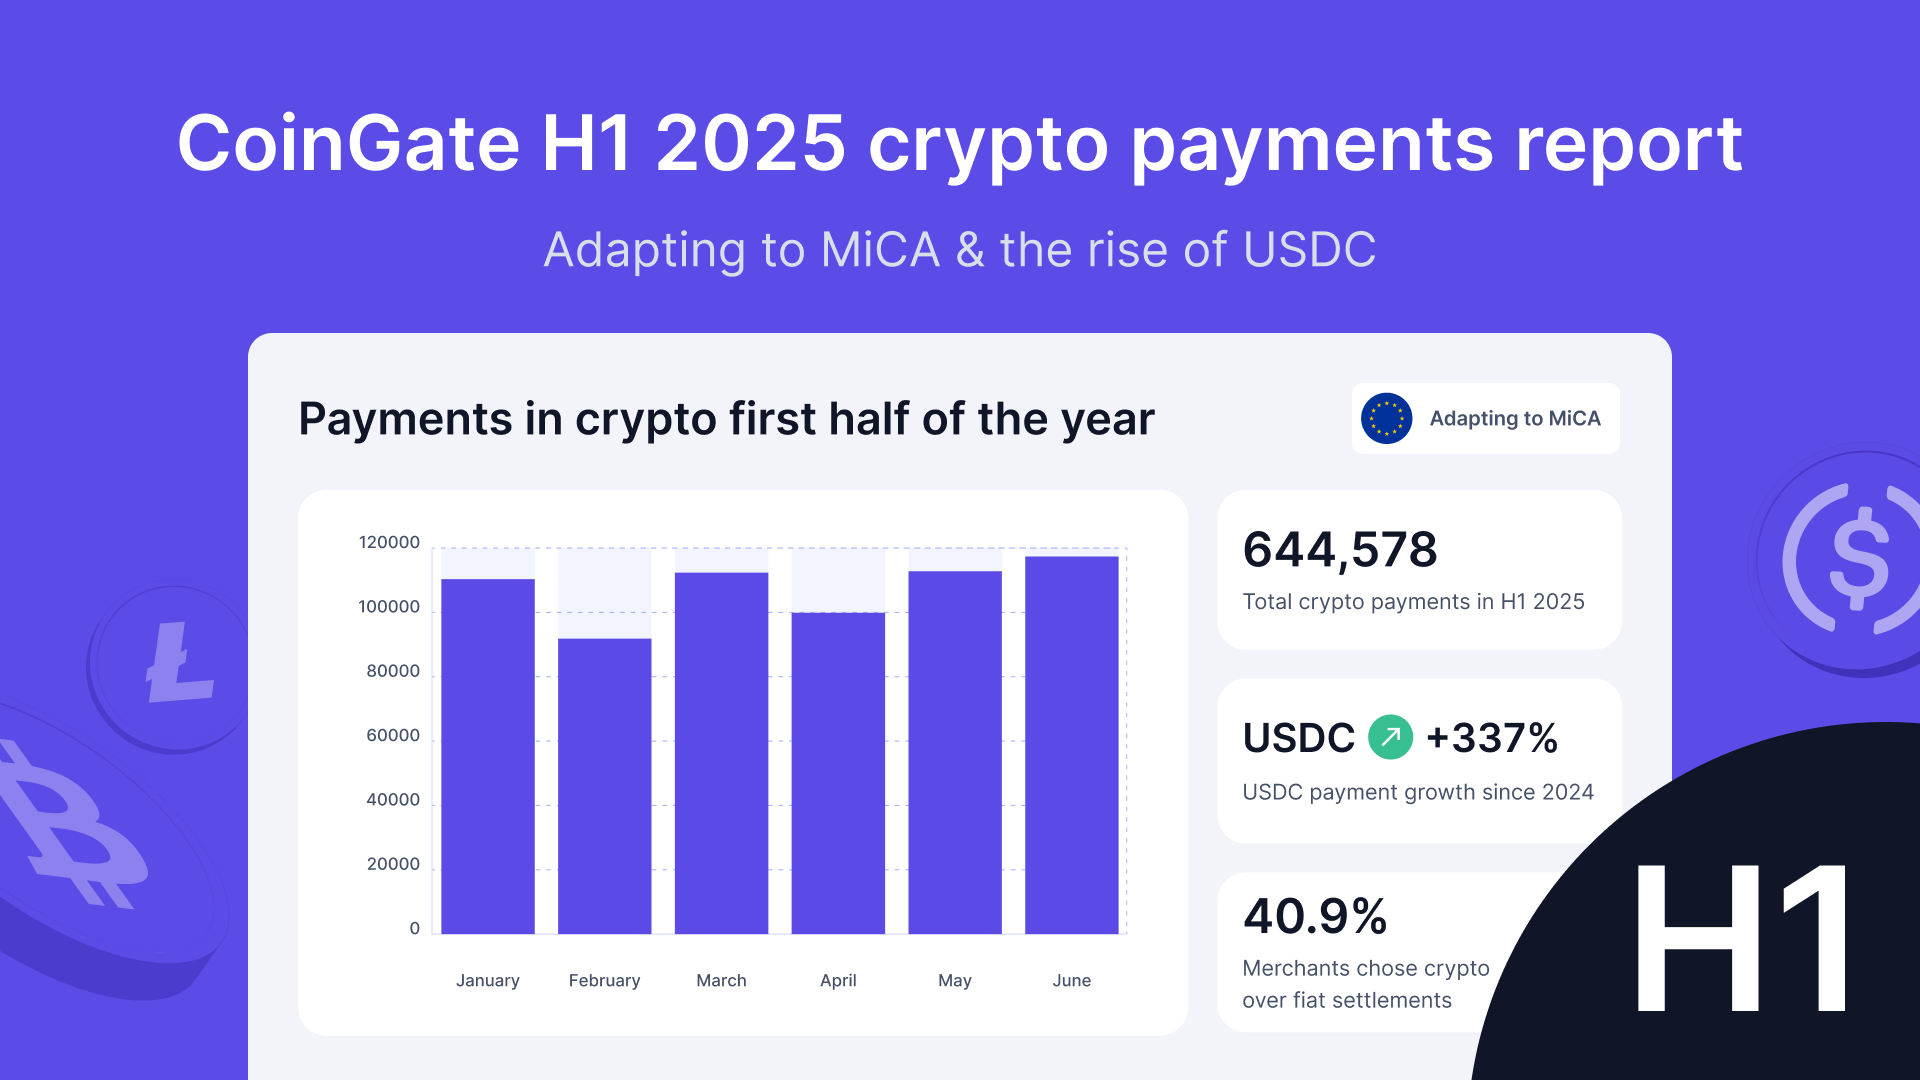
In H1 2025, CoinGate processed 644,578 crypto payments.
This period saw notable shifts: regulatory changes shook up the stablecoin landscape, Bitcoin regained a crown, USDC stablecoin surged in popularity, and merchants showed greater appetite for holding crypto.
Let’s dive into the data and insights!
Key Highlights and Trends:
- USDC emerges as the new stablecoin leader. Following MiCA regulations and the phase-out of USDT, USDC usage soared by 337%, becoming a top-five currency and accounting for 68% of all crypto payouts.
- Bitcoin reclaims dominance. Bitcoin overtook USDT as the most-used cryptocurrency in Q2 and also became the leading blockchain network, benefiting from shifts in stablecoin infrastructure.
- Layer-2 networks drive innovation. The adoption of Polygon, Base, and Arbitrum significantly boosted USDC transaction volume, improving speed and cost-efficiency across payments.
- Merchants embrace crypto. Crypto settlements rose to 40.9% of all activity – up from 27% in 2024 – showing growing merchant trust in holding digital assets, particularly stablecoins.
Despite a shifting regulatory landscape, crypto payments exhibited resilience and adaptability throughout H1 2025.
January and March saw robust transaction volumes, with a usual seasonal dip in February.
The introduction of MiCA regulations in late March disrupted USDT volumes, causing a slight drop in April. However, the market quickly adapted, recovering in May and reaching a high point in June.
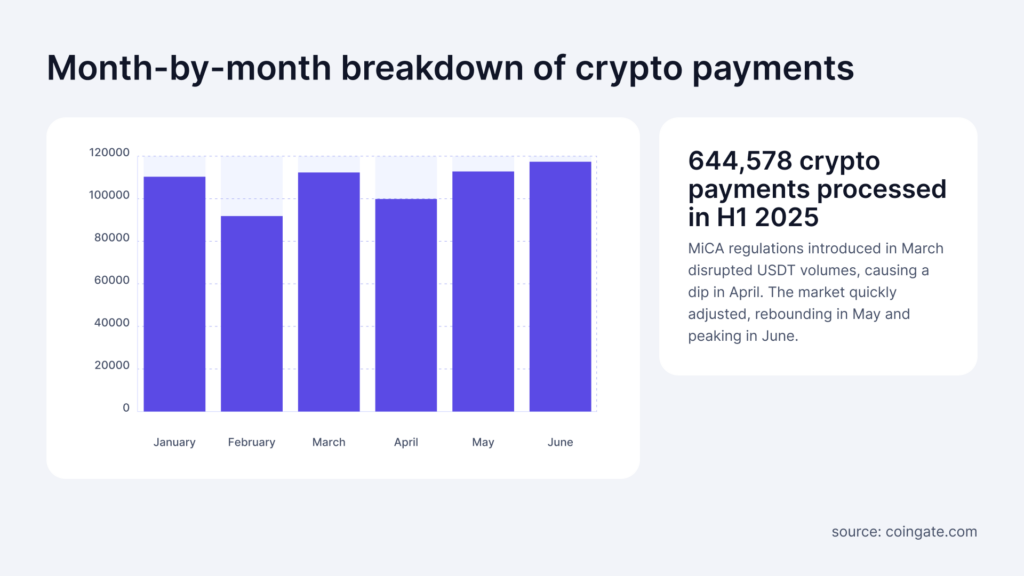
Q2 demonstrated a 5% increase in payment volume compared to Q1.
Stablecoins: Navigating Regulatory Waters
Stablecoins retained their critical role, representing over a third of total transactions.
USDT, despite regulatory challenges, remained dominant but began losing ground in late March after CoinGate started phasing out its support in response to MiCA regulations.
As a result, businesses and consumers quickly shifted toward USDC, drawn by its regulatory compliance and availability across multiple blockchain networks.
We anticipated that regulatory clarity would boost USDC’s usage – and that’s exactly what happened. In fact, USDC’s payment count in H1 2025 was 337% higher than in 2024.
By H1 2025, USDC jumped into the top five coins and accounted for 27.3% of all stablecoin payments on our platform (up from just ~2.5% in 2024). By June, it had already overtaken USDT by payment volume.
- Overall stablecoin use: Maintained strong representation at 34.1% of total transactions.
- USDT: Still the dominant stablecoin at 72.6% in H1 overall, though reduced due to MiCA.
- USDC: Experienced rapid growth (27.3%) as a compliant and accessible alternative.
Stablecoins will continue to be a driving force, possibly even more so as regulations solidify. USDT’s future in regulated markets is uncertain, but if it fades, we expect USDC (and potentially Euro-backed stablecoins or others) to fill the gap even more.
As of now, stablecoins have proven their worth for both consumers and businesses – offering the stability of fiat with the flexibility of crypto – so their share of transactions could very well grow beyond the ~34% we see now.
Merchant Preferences: Payouts & Settlements
The first half of 2025 illustrated merchants’ growing confidence in crypto, as payment settlement behavior shifts.
Nearly 41% of all merchants chose crypto settlements over traditional currencies, a significant 14% increase from a previous year, although 59.1% still settle to fiat, such as EUR.
Meanwhile, USDC emerged as the clear favorite for merchant payouts, chosen for its stability and compliance advantages, dominating with 68% usage.
Payout Trends:
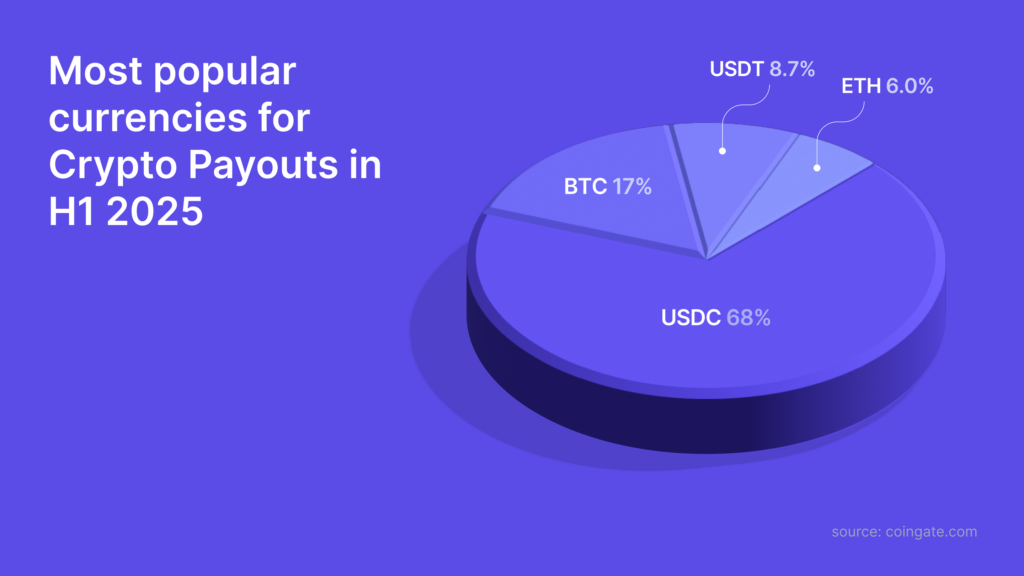
- USDC: Dominated merchant payouts with 68% usage.
- BTC: Second-most popular at 17%, appealing as a treasury asset.
- USDT and ETH: Smaller but relevant shares at 8.7% and 6%, respectively.
- FX Conversions: 77% of payout merchants converted EUR predominantly into USDC.
- Automation: 78% utilized APIs for payout automation, highlighting operational efficiency, while the remaining 22% use payouts from the account dashboard.
Settlement Behavior:
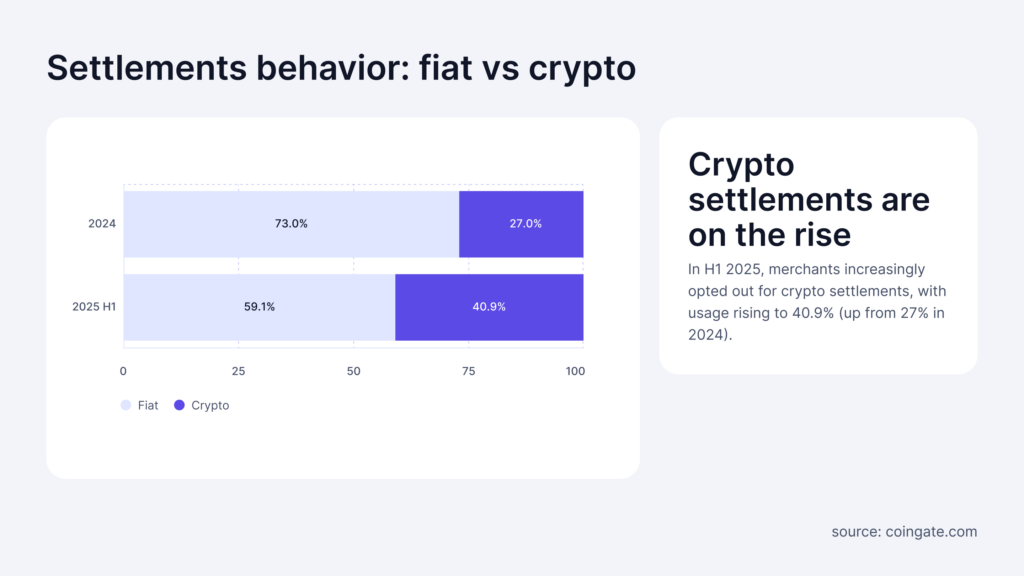
- Shift to Crypto: Fiat settlements decreased to 59.1%; crypto settlements rose significantly to 40.9%.
- Stablecoin settlements: Grew to 26.4%, reinforcing merchant confidence.
- Preferred crypto settlements: Predominantly BTC, USDT, and increasingly USDC.
Merchants holding crypto is a trend we’re delighted to see. It signals maturation – businesses treating crypto as part of their treasury or operations, not just a passthrough medium. If crypto markets remain robust, more merchants could be enticed to keep a portion of their sales in crypto (especially in stablecoins that carry minimal risk).
Merchant adoption was already strong coming into 2025, and with clearer laws and successful case studies of businesses thriving with crypto, we anticipate even more companies will join the fold.
Top Cryptocurrencies in Detail
USDT retained its position as the leading cryptocurrency with 24.8% share for the entire first half, though its popularity waned significantly after regulatory changes.
BTC, capitalizing on this shift, reclaimed the top position in Q2, ending H1 with 23.3%.
LTC consistently held third place, notably rising to second briefly in June, underscoring its reliability and efficiency as a payment method.
The standout story, however, was the exceptional growth of USDC. Previously ranked 11th in 2024, USDC’s use soared, driven by its MiCA-driven regulatory acceptance and the extensive network options available for transactions.
ETH maintained its solid presence, rounding out the top five alongside USDC.
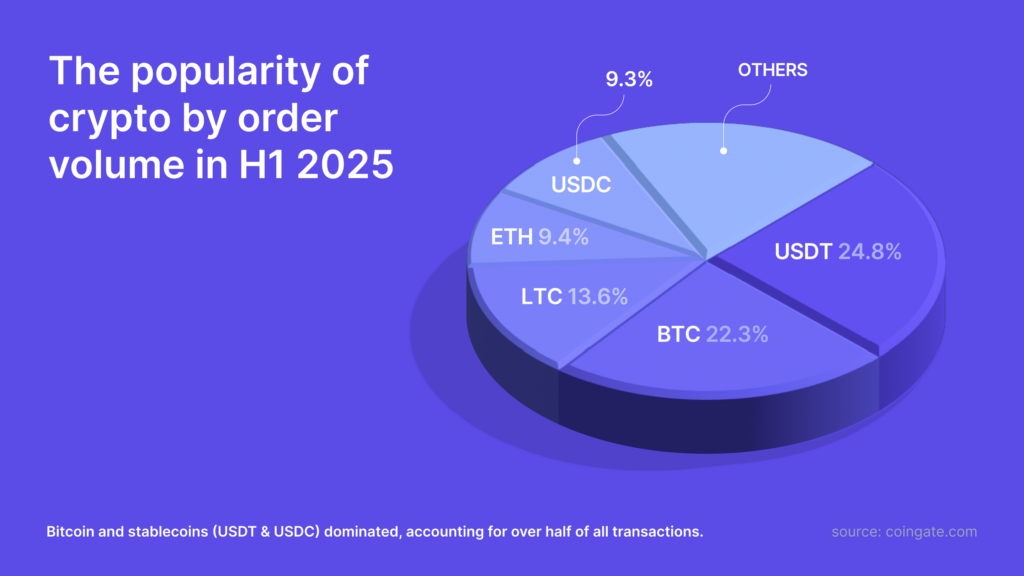
- USDT: Remained first with 24.8%, despite declining in Q2 due to regulatory pressures.
- Bitcoin (BTC): Claimed the top position in Q2 (23.8%), narrowly behind USDT overall at 23.3% for H1.
- Litecoin (LTC): Steady performance at 13.6%, briefly becoming the second most-used crypto in June.
- Ethereum (ETH): Maintained a strong presence with a 9.4% market share.
- USDC: Significant rise to 9.3%, driven by regulatory compliance and multi-network functionality.
Collectively, BTC and stablecoins (USDT & USDC) dominated, accounting for over half of all transactions.
BTC reclaiming the top spot underscores that the original cryptocurrency isn’t going anywhere as a payment method. Its popularity might further increase if global economic conditions make BTC an attractive store of value.
Blockchain Networks: Bitcoin’s Resurgence and Emerging Players
Bitcoin’s blockchain reclaimed its leading status at 23.3% share of all payments, directly benefiting from Tron’s reduced popularity due to falling USDT use.
Tron, still strong at 21.6%, saw its dominance challenged as regulatory pressures reshaped the stablecoin landscape.
Litecoin remained steadily third, while Ethereum’s slight decline to fourth (13.5%) reflected users seeking cheaper alternatives. Binance Smart Chain held steady at fifth, known for its cost-effectiveness.
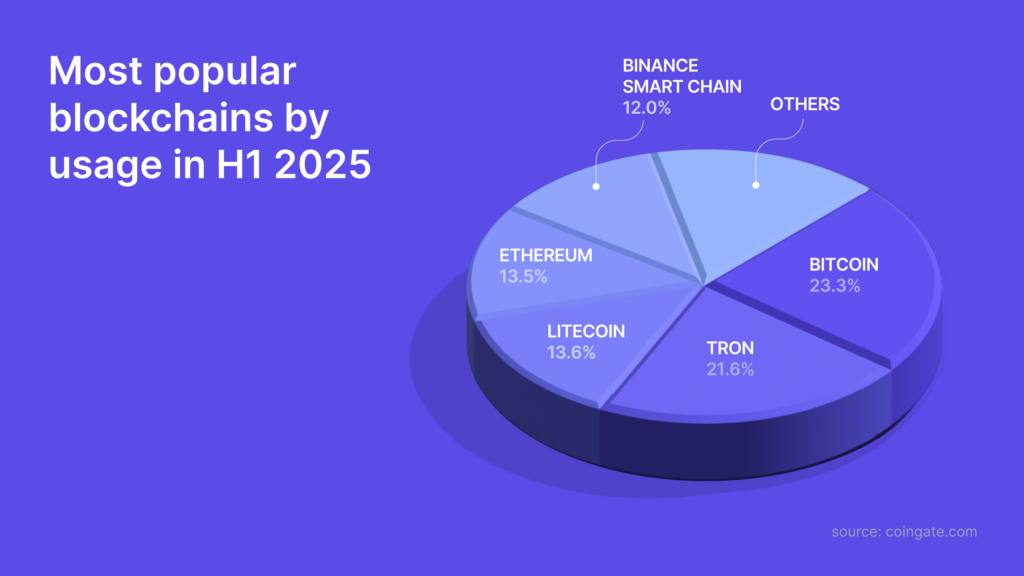
- Bitcoin: Reclaimed the top spot (23.3%) driven by declining Tron-based USDT usage.
- Tron: Dropped to second place at 21.6%, directly impacted by regulatory limitations on USDT.
- Litecoin: Remained consistent in third place with 13.6% of network activity.
- Ethereum: Fourth place at 13.5%, slightly declining due to transaction costs.
- Binance Smart Chain (BSC): Fifth at 12.0%, favored for its affordability and ease.
Rising Networks:
After CoinGate phased out USDT and USDC usage surged, Ethereum’s Layer-2 solutions quickly emerged as major players.
Base, introduced in February 2025, was rapidly adopted – 59% of transactions on the network involved USDC.
Likewise, Polygon saw a 117% increase in transactions compared to all of 2024, driven largely by USDC growth.
Arbitrum followed suit, becoming a key network for USDC payments – nearly one in ten USDC transactions now occur on Arbitrum.
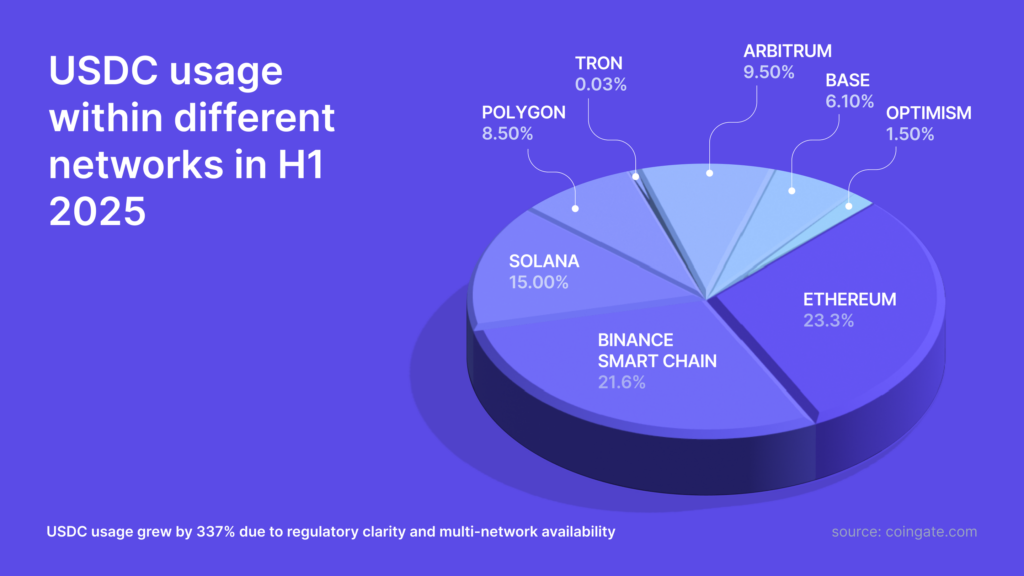
- Polygon: Transactions increased by 117% compared to the entirety of 2024.
- Base: Quickly adopted following its integration in February 2025, 59% of transactions involved USDC.
- Arbitrum: Significant growth noted, accounting for over 9% of total USDC transactions.
- Solana and Optimism: Continued their steady increase in adoption.
We expect Layer-2 and new chain adoption will keep expanding. H1 2025 was likely just the start for networks like Base, and we know there are more networks on the horizon (for example, Optimism L2 is now live).
Each new integration can open the door for more users who prefer that network, and collectively they make crypto payments more accessible. We expect to see the “Others” slice in network share grow, and perhaps one of these new networks will even challenge the current top 5 if trends continue.
Looking Ahead
The first half of 2025 has shown that crypto payments are adapting and thriving amid change.
We saw regulatory shifts (like MiCA in Europe) temporarily shake up the status quo – yet the community responded by gravitating to compliant alternatives (USDC) and tried-and-true assets (BTC).
We witnessed continued innovation in the form of Layer-2 networks making transactions faster and cheaper than ever, which in turn boosted the use of crypto (especially stablecoins) for everyday payments.
And importantly, we observed merchants becoming more comfortable with crypto, whether by holding it as an asset, using it for payouts, or simply trusting it as a stable form of money to settle in.
CoinGate will continue doing what we do best: empowering both merchants and shoppers to transact easily with crypto. The crypto payments space is evolving quickly, but we’re excited and ready for the future.
Are you ready as well? If you’re a business that hasn’t started accepting crypto yet, there’s no better time. Embracing crypto payments can open your doors to a global customer base and new revenue streams.
Don’t miss out – start accepting crypto with CoinGate today, and be part of the financial revolution that’s underway.
Here’s to a great H2 2025 and beyond, with more growth, more insights, and more innovation in the world of crypto payments.
Written by:
Vilius Barbaravičius
Vilius is a seasoned copywriter and bitcoin enthusiast specializing in blockchain and cryptocurrency topics. He's been with CoinGate since 2018, writing blogs, social media content, sales materials, newsletters, FAQs, and more. He's relentless in pursuing knowledge and a better understanding of the crypto industry, which helps him create meaningful and engaging content every day.
Vilius is a seasoned copywriter and bitcoin enthusiast specializing in blockchain and cryptocurrency topics. He's been with CoinGate since 2018, writing blogs, social media content, sales materials, newsletters, FAQs, and more. He's relentless in pursuing knowledge and a better understanding of the crypto industry, which helps him create meaningful and engaging content every day.
Related Articles