

Accept crypto with CoinGate
Accept crypto with confidence using everything you need in one platform.
How to Create a Payment Channel on CoinGate
So you want to give a client their own permanent crypto deposit address. Good news. From the CoinGate dashboard, it takes about three steps and a couple of minutes.
If you are still deciding whether payment channels fit your setup, our introduction to payment channels explains what they are and who they are for. This guide assumes you have decided, and you just want to get one running.
Let us walk through it.
Before you start
A payment channel is always tied to a contact. The contact is the client who will be sending you deposits, and it can be a person or a business. You will need a few details about them, mostly for compliance reasons we will get to in a moment.
You will also want to know two things in advance: which cryptocurrency you want to accept on this channel, and which currency you want to settle in. Have those in mind and the rest is quick.
Open your dashboard and head to the payment channels section to begin. Mind that payment channels are enabled on demand. Contact your account manager or fill the form here.
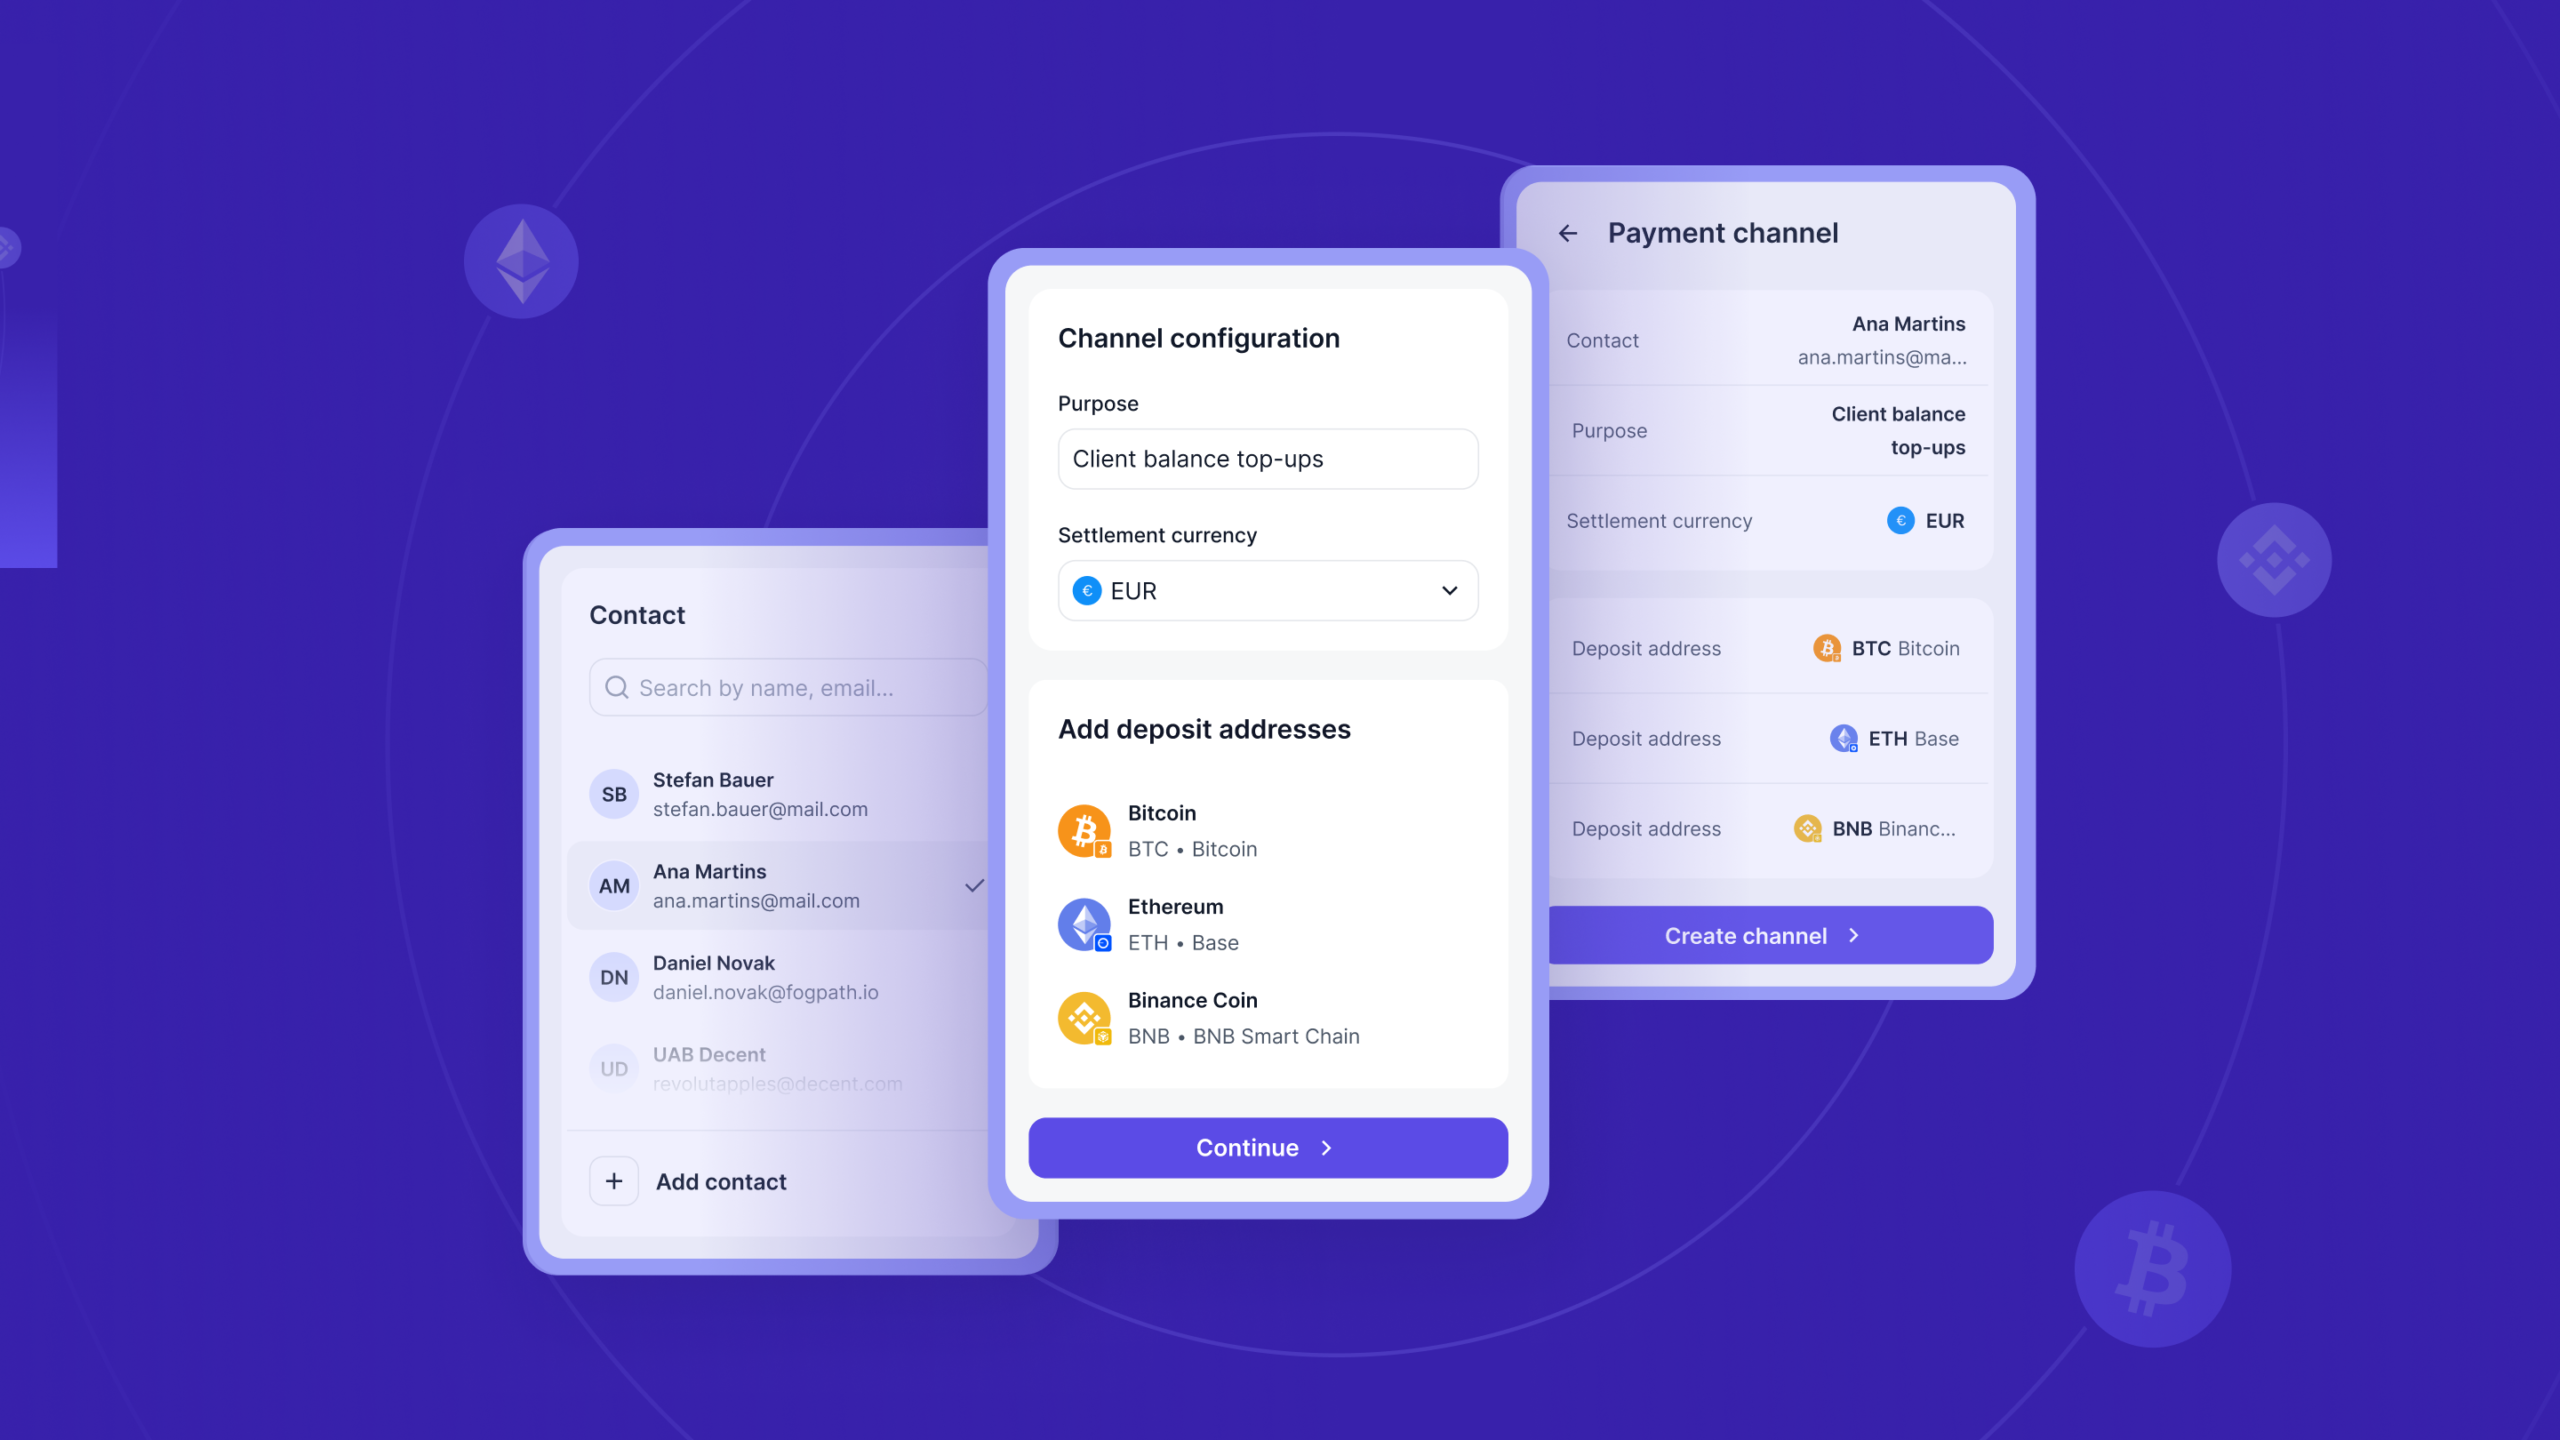
Step 1: Add the merchant contact
Every channel needs a contact attached to it. You can pick an existing one or create a new contact on the spot.
First, choose the contact type. It is either Personal or Business, and the fields differ slightly.
For a personal contact, you provide email, first name, last name, date of birth, and country of residence. For a business contact, you provide email, company name, company or LEI code, and country of registration.
These are not arbitrary form fields. They are Travel Rule (TFR) data, which we are required to collect on the parties to a crypto transfer. If you reuse an existing contact, the system checks whether all the required fields are present and prompts you for anything missing.
A quick note on something you might run into. Occasionally a contact cannot be created and you see a generic message asking you to contact support. That is a compliance check doing its job behind the scenes. If you believe it is a mistake, reach out and our team will look into it.
You can also upload a proof document against the contact later, either a personal ID or a business agreement. It is optional at creation, but worth having on file if compliance ever asks. More on the why in our guide to running a compliant crypto operation.
Step 2: Choose assets and settlement
This is where you decide what the channel actually accepts.
Set the purpose. There is a free-text purpose field, something like “Monthly subscription deposits” or “Advertiser top-ups.” Keep it specific and real. Placeholder entries like “test,” “n/a,” or “123” get rejected, and one channel holds one purpose. If a client deposits for two different reasons, that is two channels.
Pick the currency. Choose the cryptocurrency you want to accept. Here is the part that surprises people the first time, so it is worth understanding.
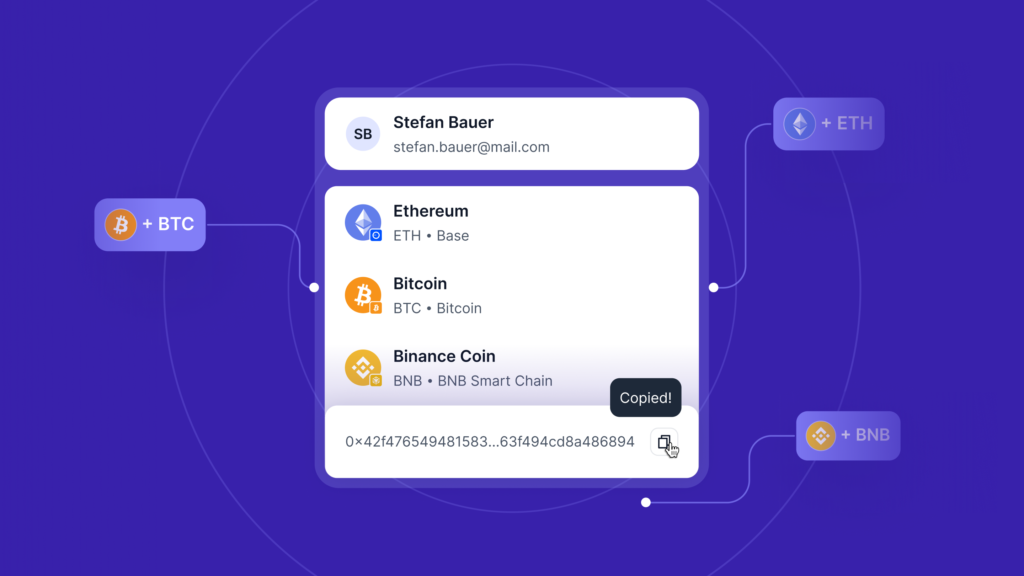
When you select a currency, the platforms expand automatically, and the number of addresses you get depends on the blockchains involved:
- EVM-compatible chains share one address. Ethereum, Polygon, Arbitrum, and BSC all use the same address for a given currency.
- Standalone chains each get their own. Bitcoin, Solana, Tron, and XRP need a unique address each.
So if you pick a currency that lives on an EVM chain plus Tron plus Solana, you will end up with three addresses on the channel. That is expected, not a glitch. Each address is permanent and belongs to this client.
Choose your settlement currency. Decide how you want the money to land. You can keep the original crypto, or auto-convert each deposit to EUR, USD, or GBP at the moment it settles. The full list of supported currencies and chains lives on the supported currencies page.
Step 3: Review and create
The last screen is a summary. You will see the contact, the purpose, the settlement currency, and the addresses about to be generated.
Check it, confirm, and the channel goes live. The addresses are ready to share with your client immediately.
That is it. Your client saves the address once and deposits to it whenever they want, with no further setup on your side.
After the channel is live
A few things you will want to know once you are up and running.
The channel table gives you the overview: contact, channel ID, purpose, settlement currency, and status, all in one list.
The channel view shows the detail. You get the contact card with its TFR fields (anything missing is flagged), the table of crypto addresses with a copy button and any required memo, and your settlement configuration.
Adding assets is simple. If a client later wants to deposit a different currency, use the Add Assets action to generate additional addresses on the same channel. No need to start over.
Document upload stays available from the channel overview, so you can attach a contact’s proof documents whenever you need to.
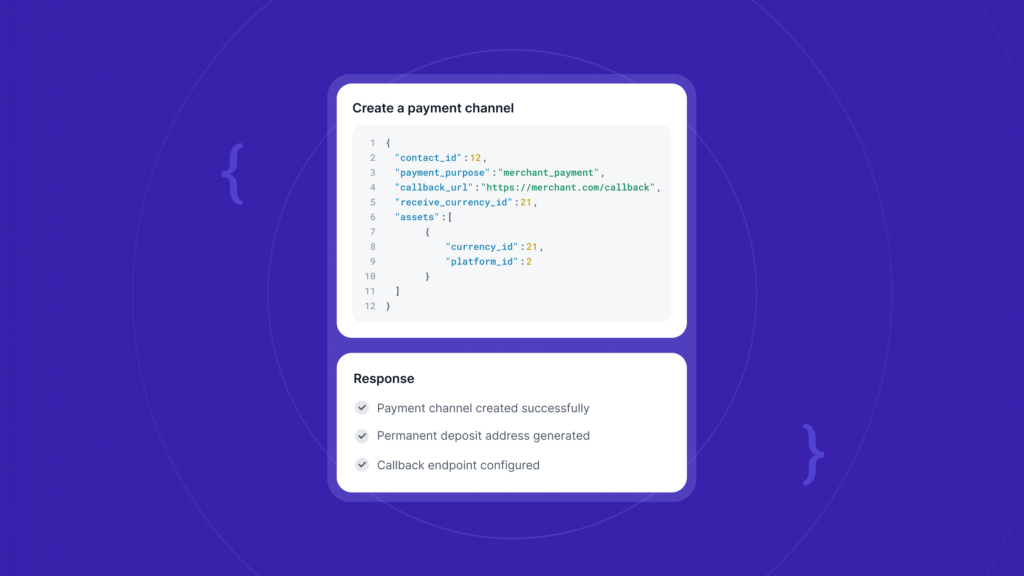
Prefer to do this in code?
Everything above can be done through the API instead of the dashboard, which is the better path if you are creating channels for many clients at once. Our payment channels API page walks through the full flow, from creating a contact to receiving deposit callbacks.
Wrapping up
Creating a payment channel is mostly about two decisions: who the client is, and what you want to accept and settle in. Add the contact, pick the assets and settlement, review, and you are done. The compliance checks and attribution run quietly underneath, so the only thing left to do is hand your client their address.
Ready to set up your first one? Check out our payment channel integration quickstart guide.
FAQ
Do I need a separate channel for each client?
Yes. A channel is tied to one contact, which keeps every client’s deposits cleanly attributed and auditable.
Can one channel accept more than one cryptocurrency?
Yes. Use the Add Assets action to generate addresses for additional currencies on the same channel. Just keep the purpose consistent, since one channel holds one purpose.
Why did one currency create several addresses?
Because EVM chains share an address while standalone chains like Bitcoin, Solana, and Tron each need their own. Selecting a currency that spans several chains generates an address per non-EVM chain.
Does my client need a CoinGate account to pay?
No. They just send crypto to the address you assigned them.\The answer is no.
Can I change the settlement currency later?
Yes. Settlement is configurable from the channel view after creation.
Accept crypto with CoinGate
Accept crypto with confidence using everything you need in one platform.